Banner Ads in Android App?
You know that when the website is ready, you apply for Google AdSense when your site is ready for monetization. But there is Google AdMob in mobile platform. Although AdMob you can put ads in your app and generate revenue.
So friend, today we’ll discuss about AdMob adsense. You can integration ads in your app.
What type of advertising are you talking about here?
Generally we’ll discuss about banner Ad.
Banner Ads: These types of ads are seen in most of the apps. Banner ads are rectangular ads and can be placed at the bottom or top. Banner ads are shown when users interact with the app.
Android AdMob Banner Ad Example
We generally use xml layout file to show banner ads. Also we can set the size according to the device. Apart from this, we can also put banner ad programmatically.
So let’s understand practically how to implement AdMob banner ads. We are using AdMob test App ID and Unit ID. After the test is complete, you can use the actual Ad App ID and Unit ID that AdMob provides.
How to Implement Banner Ads on Apps? with example
Step 1:
Create a new project in Android Studio.
Step 2:
Open build.gradle(:app) and add below dependency.
implementation 'com.google.android.gms:play-services-ads:20.4.0'
Don’t forget to click on the Sync Now button shown at the top.
Step 3:
Add internet permission and app id in AndroidManifest.xml file.
App ⇾manifests⇾AndroidManifest.xml
Add internet Permission
<uses-permission android:name="android.permission.INTERNET"/>
Add App ID meta data between <application> tags.
<meta-data
            android:name="com.google.android.gms.ads.APPLICATION_ID"
            android:value="@string/appId"/>
If you want to show video ads then add hardware acceleration enabled in manifest file, usually hardware acceleration is enabled by default. You can also enable or disable each activity.
The complete code of manifests.xml file is given below.
Manifests.xml
<?xml version="1.0" encoding="utf-8"?>
<manifest xmlns:android="http://schemas.android.com/apk/res/android"
    package="com.example.bannerads">
<uses-permission android:name="android.permission.INTERNET"/>
    <application
        android:allowBackup="true"
        android:icon="@mipmap/ic_launcher"
        android:label="@string/app_name"
        android:roundIcon="@mipmap/ic_launcher_round"
        android:supportsRtl="true"
        android:theme="@style/Theme.BannerAds">
        <activity android:name=".MainActivity">
            <intent-filter>
                <action android:name="android.intent.action.MAIN" />

                <category android:name="android.intent.category.LAUNCHER" />
            </intent-filter>
        </activity>
        <meta-data
            android:name="com.google.android.gms.ads.APPLICATION_ID"
            android:value="@string/appId"/>
    </application>

</manifest>
Step 4:
Open Strings resource file and add ad App Id and adUnitId.
Res⇾values⇾strings.xml
The complete code of strings.xml file is given below.
Strings.xml
<resources>
    <string name="app_name">BannerAds</string>
    <string name="appId">ca-app-pub-3940256099942544~3347511713</string>
    <string name="adUnitId">ca-app-pub-3940256099942544/6300978111</string>
</resources>
Step 5:
Now update activity_main.xml and add AdView inside relative layout.
Res⇾layout⇾activity_main.xml
The complete code of activity_main.xml file is given below.
activity_main.xml
<?xml version="1.0" encoding="utf-8"?>
<RelativeLayout xmlns:android="http://schemas.android.com/apk/res/android"
    xmlns:app="http://schemas.android.com/apk/res-auto"
    xmlns:tools="http://schemas.android.com/tools"
    android:layout_width="match_parent"
    android:layout_height="match_parent"
    tools:context=".MainActivity">

    <com.google.android.gms.ads.AdView
        xmlns:ads="http://schemas.android.com/apk/res-auto"
        android:id="@+id/adView"
        android:layout_width="wrap_content"
        android:layout_height="wrap_content"
        android:layout_centerHorizontal="true"
        android:layout_alignParentBottom="true"
        ads:adSize="BANNER"
        ads:adUnitId="@string/adUnitId">
    </com.google.android.gms.ads.AdView>

</RelativeLayout>
Step 6:
Open MainActivity.java
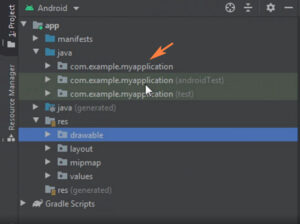
App⇾java⇾package name⇾MainActivity.java
First of all initialize the Google Mobile Ads SDK. Visit for more info.
 MobileAds.initialize(this, new OnInitializationCompleteListener() {
            @Override
            public void onInitializationComplete(InitializationStatus initializationStatus) {
            }
        });
After that we use loadAds method in AdView class.
We use below code for ad load method.
mAdView.loadAd(adRequest);
The complete code of MainActivity.java file is given below.
MainActivity.java
package com.example.bannerads;

import androidx.appcompat.app.AppCompatActivity;

import android.os.Bundle;

import com.google.android.gms.ads.AdRequest;
import com.google.android.gms.ads.AdView;
import com.google.android.gms.ads.MobileAds;
import com.google.android.gms.ads.initialization.InitializationStatus;
import com.google.android.gms.ads.initialization.OnInitializationCompleteListener;

public class MainActivity extends AppCompatActivity {
    private AdView mAdView;

    @Override
    protected void onCreate(Bundle savedInstanceState) {
        super.onCreate(savedInstanceState);
        setContentView(R.layout.activity_main);

        MobileAds.initialize(this, new OnInitializationCompleteListener() {
            @Override
            public void onInitializationComplete(InitializationStatus initializationStatus) {
            }
        });

        mAdView = findViewById(R.id.adView);
        AdRequest adRequest=new AdRequest.Builder().build();
        mAdView.loadAd(adRequest);
    }
    }
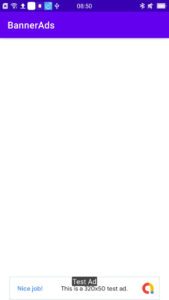
Now the banner ad is complete. Now run the project and the output will look like the screenshot below.


