So friends, today we will discuss RecyclerView in android. We will show the recyclerview with SQLite databases.
We have already discussed RecycleView, here we will not only discuss RecycleView but also SQLite database. User manually inserts data by Editing Text and displays rows of data in recycleview.
What will we include in this recycleview?
This is a very important question before you start coding.
You should be aware of this topic, so that you can understand clearly. So friends, below are some topics which are covered in these tutorials.
DBmain: in this java class we’ll create a database and table to handling SQLite database also extends SQLiteOpenHelper class.
Model java class: data class that we use constructor and getter setter method for retrieving and updating the value of variable.
Adapter class: we make an adapter class for handling data. When we need to display data SQLite to TextView at that time we needed to this class.
MainActivity: this is a default activity or launch activity. In this activity, we’ll handling and data like layout manager.
MainActivity2: we’ll create a second activity to display data in recyclerview.
Now, discuss xml file.
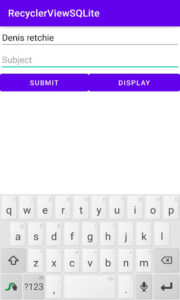
activity_main.xml : For creating Designing EditText buttons like submit and display. In a simple in XML file, we will create a front-end design of how users interact with the interface.
activity_main2: we will use the recycling widget to show the data in recyclerview
singledata: In this xml file we will create a simple single data view xml file that passes the data through an adapter. In simple, it is the single dataview file with which you can interact.
Now let us discuss the coding.
First of all, we’ll be creating a database helper class for handling databases and table.
Create a new class named DBmain.
App⇾java⇾right click on package name ⇾ new ⇾ java
We’ll extend SQLiteOpenHelper class for creating and manage the database.
Also, we’ll implement a subclass named onCreate and onUpgrade for opening the database if it exists. onUpgrade is version management or upgratting old to a new database.
Here given full DBmain code
DBmain.java
package com.example.recyclerviewsqlite;

import android.content.Context;
import android.database.sqlite.SQLiteDatabase;
import android.database.sqlite.SQLiteOpenHelper;

import androidx.annotation.Nullable;

public class DBmain extends SQLiteOpenHelper {
    public static final String DBNAME="student";
    public static final String TABLENAME="course";
    public static final int VER=1;
    public DBmain(@Nullable Context context) {
        super(context, DBNAME, null, VER);
    }
    @Override
    public void onCreate(SQLiteDatabase db) {
        String query="create table "+TABLENAME+"(id integer primary key, name text, subject text)";
        db.execSQL(query);
    }
    @Override
    public void onUpgrade(SQLiteDatabase db, int oldVersion, int newVersion) {
    String query="drop table if exists "+TABLENAME+"";
    db.execSQL(query);
    }
}
Now, go to activity_main.xml
app⇾src⇾layout⇾activity_main.xml
In this xml file, we’ll use a user interface like EditText and buttons.
Below code activity_main.xml
activity_main.xml
<?xml version="1.0" encoding="utf-8"?>
<LinearLayout xmlns:android="http://schemas.android.com/apk/res/android"
    xmlns:app="http://schemas.android.com/apk/res-auto"
    xmlns:tools="http://schemas.android.com/tools"
    android:layout_width="match_parent"
    android:layout_height="match_parent"
    android:orientation="vertical"
    tools:context=".MainActivity">

<EditText
    android:hint="Name"
    android:layout_width="match_parent"
    android:layout_height="wrap_content"
    android:id="@+id/name"/>

    <EditText
        android:hint="Subject"
        android:layout_width="match_parent"
        android:layout_height="wrap_content"
        android:id="@+id/subject"/>
    <LinearLayout
        android:layout_width="match_parent"
        android:layout_height="wrap_content"
        android:orientation="horizontal">
        <Button
            android:text="Submit"
            android:layout_width="wrap_content"
            android:layout_height="wrap_content"
            android:layout_weight="1"
            android:id="@+id/btnsubmit"/>
        <Button
            android:text="Display"
            android:layout_width="wrap_content"
            android:layout_height="wrap_content"
            android:layout_weight="1"
            android:id="@+id/btndisplay"/>
    </LinearLayout>
</LinearLayout>
Go to MainActivity.java
In this java activity, we will put all the logic of activity_main.xml. Thus the button clicks and inserts the data into the SQLite database. We have already discussed this in the SQLite database or ListView crude operation.
The given below code of MainActivity.java
MainActvity.java
package com.example.recyclerviewsqlite;

import androidx.appcompat.app.AppCompatActivity;

import android.content.ContentValues;
import android.content.Intent;
import android.database.sqlite.SQLiteDatabase;
import android.database.sqlite.SQLiteOpenHelper;
import android.os.Bundle;
import android.view.View;
import android.widget.Button;
import android.widget.EditText;
import android.widget.Toast;

public class MainActivity extends AppCompatActivity {
EditText name,sub;
Button submit,display;
DBmain dBmain;
SQLiteDatabase sqLiteDatabase;
    @Override
    protected void onCreate(Bundle savedInstanceState) {
        super.onCreate(savedInstanceState);
        setContentView(R.layout.activity_main);
        dBmain=new DBmain(this);
        //create method
        findid();
        insertData();
        cleardata();
    }

    private void cleardata() {
        name.setText("");
        sub.setText("");
    }

    private void insertData() {
        submit.setOnClickListener(new View.OnClickListener() {
            @Override
            public void onClick(View v) {
                sqLiteDatabase=dBmain.getWritableDatabase();
                ContentValues cv=new ContentValues();
                cv.put("name",name.getText().toString());
                cv.put("subject",sub.getText().toString());

                Long recid=sqLiteDatabase.insert("course",null,cv);
                if (recid!=null){
                    Toast.makeText(MainActivity.this, "successfully insert", Toast.LENGTH_SHORT).show();
                    cleardata();
                }else{
                    Toast.makeText(MainActivity.this, "something wrong try again", Toast.LENGTH_SHORT).show();
                }
            }
        });
        display.setOnClickListener(new View.OnClickListener() {
            @Override
            public void onClick(View v) {
                startActivity(new Intent(MainActivity.this, DisplayData.class));
            }
        });
    }

    private void findid() {
        name=(EditText)findViewById(R.id.name);
        sub=(EditText)findViewById(R.id.subject);
        submit=(Button)findViewById(R.id.btnsubmit);
        display=(Button)findViewById(R.id.btndisplay);
    }
}
Now, create a model class.
App⇾java⇾right click on package name⇾new ⇾java class
In the Model class, we implement the constructor and getter and setter methods used in the Adapter class.
The code of model.java is given below.
Model.java
package com.example.recyclerviewsqlite;

public class Model {
    private String sname;
    private String ssubject;
    private int id;
    //constructor

    public Model(String sname, String ssubject) {
        this.sname = sname;
        this.ssubject = ssubject;
    }
    //getter and setter

    public String getSname() {
        return sname;
    }

    public void setSname(String sname) {
        this.sname = sname;
    }

    public String getSsubject() {
        return ssubject;
    }

    public void setSsubject(String ssubject) {
        this.ssubject = ssubject;
    }

    public int getId() {
        return id;
    }

    public void setId(int id) {
        this.id = id;
    }
}
Now we make an adapter class. Let’s understand adapter by example.
Now, when you have to make mango juice, then we use a mixer. So we connect the pin of the mixer to the board. Here the mixer wire acts as an adapter. In short, creating a view of each item in the using adapter class. The code of Adapter class is given below.
MyAdapter.java
package com.example.recyclerviewsqlite;

import android.content.Context;
import android.graphics.Color;
import android.view.LayoutInflater;
import android.view.View;
import android.view.ViewGroup;
import android.widget.ImageView;
import android.widget.TextView;

import androidx.annotation.NonNull;
import androidx.recyclerview.widget.RecyclerView;

import java.util.ArrayList;
import java.util.Random;

public class MyAdapter extends RecyclerView.Adapter<MyAdapter.ViewHoder> {
    private ArrayList<Model>modelArrayList;
    private Context context;

    //constructor

    public MyAdapter(ArrayList<Model> modelArrayList, Context context) {
        this.modelArrayList = modelArrayList;
        this.context = context;
    }

    @NonNull
    @Override
    public MyAdapter.ViewHoder onCreateViewHolder(@NonNull ViewGroup parent, int viewType) {
        View view= LayoutInflater.from(parent.getContext()).inflate(R.layout.singledata,parent,false);
        return new ViewHoder(view);
    }

    @Override
    public void onBindViewHolder(@NonNull MyAdapter.ViewHoder holder, int position) {
      Model model=modelArrayList.get(position);
      holder.txtname.setText(model.getSname());
      holder.txtsub.setText(model.getSsubject());

      //icon background random color
        Random random=new Random();
        int color= Color.argb(255,random.nextInt(255),random.nextInt(255),random.nextInt(256));
    holder.icon.setBackgroundColor(color);
    }

    @Override
    public int getItemCount() {
        return modelArrayList.size();
    }
    public class ViewHoder extends RecyclerView.ViewHolder{
        private TextView txtname,txtsub;
        private ImageView icon;

        public ViewHoder(@NonNull View itemView) {
            super(itemView);
            txtname=(TextView)itemView.findViewById(R.id.txtname);
            txtsub=(TextView)itemView.findViewById(R.id.txtsub);
            icon=(ImageView)itemView.findViewById(R.id.icon);
        }
    }
}
Create a singledata.xml file to view each item in singledata.
Right click on Layout⇾new ⇾Layout Resource File
In singledata we’ll create a single view.
The given below code of singledata.xml
singledata.xml
<?xml version="1.0" encoding="utf-8"?>
<androidx.cardview.widget.CardView xmlns:android="http://schemas.android.com/apk/res/android"
    android:layout_width="match_parent"
    android:layout_height="wrap_content"
    xmlns:app="http://schemas.android.com/apk/res-auto"
    android:elevation="8dp"
    app:cardCornerRadius="12dp"
    app:cardMaxElevation="2dp"
    app:cardUseCompatPadding="true"
    app:cardPreventCornerOverlap="true">
<ImageView
    android:layout_width="40dp"
    android:layout_height="40dp"
    android:id="@+id/icon"
    android:scaleType="centerCrop"
    android:src="@drawable/ic_baseline_account_circle_24"/>
    <RelativeLayout
        android:layout_width="match_parent"
        android:layout_height="wrap_content">
        <TextView
            android:layout_marginLeft="50dp"
            android:layout_width="wrap_content"
            android:layout_height="wrap_content"
            android:id="@+id/textviewname"
            android:text="Name : "
            android:textStyle="bold"
            android:textSize="20dp"/>
        <TextView
            android:layout_width="match_parent"
            android:layout_height="wrap_content"
            android:id="@+id/txtname"
            android:textSize="20dp"
            android:layout_toEndOf="@+id/textviewname"
            android:text="name"/>

        <TextView
            android:layout_marginLeft="50dp"
            android:layout_width="wrap_content"
            android:layout_height="wrap_content"
            android:layout_below="@+id/textviewname"
            android:id="@+id/textviewname2"
            android:text="Subject : "
            android:textStyle="bold"
            android:textSize="10dp"/>
        <TextView
            android:layout_width="match_parent"
            android:layout_height="wrap_content"
            android:id="@+id/txtsub"
            android:layout_below="@+id/textviewname"
            android:layout_toEndOf="@+id/textviewname2"
            android:textSize="10dp"
            android:text="Subject"/>
    </RelativeLayout>
</androidx.cardview.widget.CardView>
Now, we need a new activity to display the number of data in recyclerview.
Create a new activity named DisplayData.
App⇾java⇾right click on package name⇾new ⇾activity⇾empty activity
After creating a new activity go-to activity display_data.xml.
Create a Recycling View in Activity display_data.xml
The activity_display_data code is given below.
activity_display_data.xml.
<?xml version="1.0" encoding="utf-8"?>
<RelativeLayout xmlns:android="http://schemas.android.com/apk/res/android"
    xmlns:app="http://schemas.android.com/apk/res-auto"
    xmlns:tools="http://schemas.android.com/tools"
    android:layout_width="match_parent"
    android:layout_height="match_parent"
    tools:context=".DisplayData">
<androidx.recyclerview.widget.RecyclerView
    android:layout_width="match_parent"
    android:layout_height="match_parent"
    android:id="@+id/rv"/>
</RelativeLayout>
go to DisplayData.java activity
app⇾java⇾packagename⇾DisplayData.java
Given below code of DisplayData.java
DisplayData.java
package com.example.recyclerviewsqlite;

import androidx.appcompat.app.AppCompatActivity;
import androidx.recyclerview.widget.LinearLayoutManager;
import androidx.recyclerview.widget.RecyclerView;

import android.database.Cursor;
import android.database.sqlite.SQLiteDatabase;
import android.os.Bundle;

import java.util.ArrayList;

public class DisplayData extends AppCompatActivity {
DBmain dBmain;
SQLiteDatabase sqLiteDatabase;
ArrayList<Model>modelArrayList;
MyAdapter myAdapter;
RecyclerView recyclerView;
    @Override
    protected void onCreate(Bundle savedInstanceState) {
        super.onCreate(savedInstanceState);
        setContentView(R.layout.activity_display_data);

        modelArrayList=new ArrayList<>();
        dBmain=new DBmain(this);
        //create method
        findid();
        modelArrayList=displayData();
        myAdapter=new MyAdapter(modelArrayList,DisplayData.this);
        LinearLayoutManager linearLayoutManager=new LinearLayoutManager(DisplayData.this,RecyclerView.VERTICAL,false);
        recyclerView.setLayoutManager(linearLayoutManager);
        recyclerView.setAdapter(myAdapter);
    }

    private ArrayList<Model> displayData() {
        sqLiteDatabase=dBmain.getReadableDatabase();
        Cursor cursor=sqLiteDatabase.rawQuery("select *from course",null);
        ArrayList<Model>modelArrayList=new ArrayList<>();
        if (cursor.moveToFirst()){
            do {
                modelArrayList.add(new Model(cursor.getString(1),
                        cursor.getString(2)));
            }while (cursor.moveToNext());
        }
        cursor.close();
        return modelArrayList;
    }

    private void findid() {
        recyclerView=findViewById(R.id.rv);
    }
}
Let’s try to run the program
See the output below.


