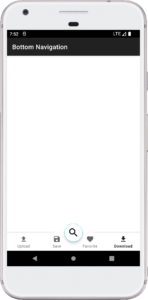
Welcome to another Android Studio tutorial! In our previous tutorial, we explored creating a simple Bottom Navigation in Android Studio. In this guide, we’ll take it a step further by implementing a stylish Bottom Navigation Bar with a centered floating design.
How to Bottom Navigation with Designing a Centered Floating Bar in android studio.
Step 1: Open Android Studio and Create a New Project
Start Android Studio and create a new project. Choose an appropriate project template and set up your project settings.
Step 2: Implementing the Bottom Navigation Bar
In this tutorial, we’ll create a visually appealing Bottom Navigation Bar with a centered floating design. This design includes icons for Upload, Save, Favorite, and Download actions.
Here is the complete code of the Bottom Navigation with Designing a Centered Floating Bar XML file.
activity_main.xml
<?xml version="1.0" encoding="utf-8"?>
<androidx.coordinatorlayout.widget.CoordinatorLayout xmlns:android="http://schemas.android.com/apk/res/android"
    xmlns:app="http://schemas.android.com/apk/res-auto"
    xmlns:tools="http://schemas.android.com/tools"
    android:layout_width="match_parent"
    android:layout_height="match_parent"
    tools:context=".MainActivity">

    <com.google.android.material.bottomappbar.BottomAppBar
        android:layout_width="match_parent"
        android:layout_height="wrap_content"
        android:layout_gravity="bottom"
        app:fabCradleRoundedCornerRadius="50dp"
        app:fabCradleMargin="10dp"
        app:contentInsetStart="0dp"
        app:contentInsetEnd="0dp"
        android:id="@+id/bottomAppBar">

        <com.google.android.material.bottomnavigation.BottomNavigationView
            android:layout_width="match_parent"
            android:layout_height="wrap_content"
            android:id="@+id/bottomNavigation"
            app:menu="@menu/bottom_nav_menu"
            android:paddingLeft="0dp"
            android:paddingRight="0dp"
            app:labelVisibilityMode="labeled"/>
    </com.google.android.material.bottomappbar.BottomAppBar>

    <com.google.android.material.floatingactionbutton.FloatingActionButton
        android:layout_width="wrap_content"
        android:layout_height="wrap_content"
        android:src="@drawable/baseline_search_24"
        app:maxImageSize="35dp"
        android:backgroundTint="@color/white"
        android:id="@+id/fab"
        app:layout_anchor="@id/bottomAppBar"/>
</androidx.coordinatorlayout.widget.CoordinatorLayout>
Step 3: Create a Menu in the “res” Directory
In Android Studio, navigate to the res directory in your project.
Right-click on the res directory, choose New, then select Android Resource Directory.
Step 4: Define Bottom Navigation Menu Items
Create a new XML file named bottom_nav_menu.xml in the res/menu directory to define menu items for the bottom navigation bar.
Here is the complete code of the bottom_nav_menu.xml XML file.
bottom_nav_menu.xml
<?xml version="1.0" encoding="utf-8"?>
<menu xmlns:android="http://schemas.android.com/apk/res/android"
    xmlns:app="http://schemas.android.com/apk/res-auto">
<item
    android:id="@+id/nav_upload"
    android:icon="@drawable/baseline_upload_24"
    android:title="Upload"
    app:showAsAction="always"/>

    <item
        android:id="@+id/nav_save"
        android:icon="@drawable/baseline_save_24"
        android:title="Save"
        app:showAsAction="always"/>

    <item
        android:id="@+id/nav_favorite"
        android:icon="@drawable/baseline_favorite_24"
        android:title="Favorite"
        app:showAsAction="always"/>

    <item
        android:id="@+id/nav_download"
        android:icon="@drawable/baseline_download_24"
        android:title="Download"
        app:showAsAction="always"/>
</menu>
Step 5: Customizing Theme and Style for Floating Button Placement
In Android Studio, locate the res/values/styles.xml file in your project. in updated android studio locate res/values/themes.xml.
themes.xml
<resources xmlns:tools="http://schemas.android.com/tools">
    <!-- Base application theme. -->
    <style name="Base.Theme.BottomNavigation" parent="Theme.MaterialComponents.DayNight.DarkActionBar">
        <!-- Customize your light theme here. -->
        <!-- <item name="colorPrimary">@color/my_light_primary</item> -->
    </style>

    <style name="Theme.BottomNavigation" parent="Base.Theme.BottomNavigation" />
</resources>
By following these steps, you’ll achieve an elegant Bottom Navigation Bar with a centered floating design, enhancing user experience in your Android app.
Now, run your app and check the expected result.


