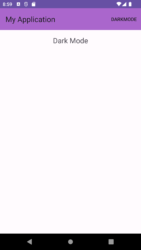
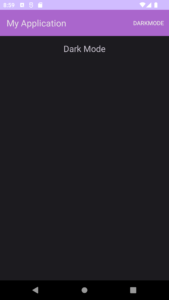
Today, we are introducing a new feature: Dark Mode for our Android app. As you may already know, Dark Mode has become increasingly popular, with many apps like WhatsApp and YouTube offering this feature.
We believe that Dark Mode is not only a trendy addition but also a valuable one. It’s a simple and effective way to protect your eyes, especially when using the app in low-light conditions. Moreover, Android devices now come with a built-in Dark Mode feature.
To help you implement Dark Mode in your Android app, we’ve outlined a step-by-step process:
Implementing Dark Mode in Android Studio App
Step 1: Create an Android Empty
Create an Android Empty Activity Project Begin by creating a new Android Empty Activity project.
Step 2: Add an Android Resource Directory.
After creating the project, add an Android Resource Directory. Right-click on “res,” navigate to “New,” and select “Android Resource Directory.”
In this directory, you’ll create a menu. To do this, right-click on “menu,” choose “New,” and create a menu resource file.
You can name your menu resource file “menu.xml.”
menu.xml
<menu xmlns:android="http://schemas.android.com/apk/res/android"
    xmlns:app="http://schemas.android.com/apk/res-auto">
    <item
        android:id="@+id/darkmodemenu"
        android:title="darkmode"
        app:showAsAction="always"/>
</menu>
Step 3: Create a Custom Toolbar.
Now, let’s create a custom toolbar. Right-click on “layout,” choose “New,” and create a layout resource file.
In your toolbar.xml file, add the custom toolbar code.
toolbar.xml
<androidx.appcompat.widget.Toolbar
    xmlns:android="http://schemas.android.com/apk/res/android"
    android:id="@+id/custom_toolbar"
    android:layout_width="match_parent"
    android:layout_height="?attr/actionBarSize"
    android:background="@android:color/holo_purple"
    android:elevation="4dp">
    <!-- Customize the contents of your custom top bar here -->
</androidx.appcompat.widget.Toolbar>
Step 4: Add the Custom Toolbar to Your Activity.
Go to your activity_main.xml file and insert the custom toolbar. Here’s the code to add to your “activity_main.xml” file.
activity_main.xml
<RelativeLayout
    xmlns:android="http://schemas.android.com/apk/res/android"
    xmlns:app="http://schemas.android.com/apk/res-auto"
    xmlns:tools="http://schemas.android.com/tools"
    android:layout_width="match_parent"
    android:layout_height="match_parent"
    tools:context=".MainActivity">

    <include
        android:id="@+id/custom_toolbar"
        layout="@layout/toolbar" />

    <TextView
        android:layout_width="wrap_content"
        android:layout_height="wrap_content"
        android:layout_centerHorizontal="true"
        android:layout_below="@id/custom_toolbar"
        android:layout_marginTop="16dp"
        android:text="Dark Mode"
        android:textSize="21sp" />
</RelativeLayout>
Step 5: Initialize the Java Code.
In your MainActivity.java (or the relevant activity file), add the following Java code to initialize the Dark Mode feature.
MainActivity.java
public class MainActivity extends AppCompatActivity {
    private SharedPreferences sharedPreferences;

    @Override
    protected void onCreate(Bundle savedInstanceState) {
        super.onCreate(savedInstanceState);
        setContentView(R.layout.activity_main);
        sharedPreferences = getSharedPreferences("my_preferences", Context.MODE_PRIVATE);
        Toolbar customToolbar = findViewById(R.id.custom_toolbar);
        setSupportActionBar(customToolbar);

        // Check if the user has set dark mode
        boolean isDarkModeEnabled = sharedPreferences.getBoolean("is_dark_mode_enabled", false);

        // Set the initial dark mode
        setDarkMode(isDarkModeEnabled);
    }

    @Override
    public boolean onCreateOptionsMenu(Menu menu) {
        getMenuInflater().inflate(R.menu.menu, menu);
        return super.onCreateOptionsMenu(menu);
    }

    @Override
    public boolean onOptionsItemSelected(@NonNull MenuItem item) {
        int itemId = item.getItemId();
        if (itemId == R.id.darkmodemenu) {
            // Toggle dark mode
            toggleDarkMode();
            return true;
        }
        return super.onOptionsItemSelected(item);
    }

    private void setDarkMode(boolean isEnabled) {
        AppCompatDelegate.setDefaultNightMode(isEnabled ? AppCompatDelegate.MODE_NIGHT_YES : AppCompatDelegate.MODE_NIGHT_NO);
        saveDarkModeState(isEnabled);
        recreate();
    }

    private void saveDarkModeState(boolean isEnabled) {
        SharedPreferences.Editor editor = sharedPreferences.edit();
        editor.putBoolean("is_dark_mode_enabled", isEnabled);
        editor.apply();
    }

    private void toggleDarkMode() {
        boolean isDarkModeEnabled = sharedPreferences.getBoolean("is_dark_mode_enabled", true);
        setDarkMode(!isDarkModeEnabled);
    }
}
Code Explanation
SharedPreferences
We use SharedPreferences to keep track of certain settings in our app. It’s like a handy notepad where we jot down small pieces of information. For instance, we use it to remember whether you prefer using Dark Mode or not. We set this up when the app starts in the onCreate method.
To access these settings, we use “my_preferences” along with “Context.MODE_PRIVATE”. It helps us check if you’ve previously chosen to use Dark Mode. If you have, then we know that “isDarkModeEnabled” should be true; otherwise, it’s set to false.
Custom Toolbar
We also make sure that the custom Toolbar is all set up. If it’s in your app’s layout with the ID “custom_toolbar,” we treat it as the main action bar for your screen using “setSupportActionBar(customToolbar).”
Handling Menu Items:
Now, when you tap on different items in the menu, we make things happen. If you choose “Dark Mode” (identified by the ID “R.id.darkmodemenu”), we switch Dark Mode on or off with the “toggleDarkMode” function.
setDarkMode
The “setDarkMode” function is like a light switch for Dark Mode. If you want Dark Mode on or off, we use this function to make it happen. We also make sure your choice is saved using SharedPreferences, and the screen refreshes to show Dark Mode accordingly.
saveDarkModeState
Whenever you decide to change Dark Mode, “saveDarkModeState” comes into play. It takes your preference (whether you like Dark Mode or not) and keeps it in SharedPreferences with the label “is_dark_mode_enabled.” This way, we ensure your choice sticks.
toggleDarkMode
“toggleDarkMode” is the magic wand for Dark Mode. It looks at your current preference in SharedPreferences and does the opposite. If it was on, it turns it off, and if it was off, it turns it on. So, it’s all about making Dark Mode just the way you like it!


