Overview
- In the previous tutorial, we learned CardView with dialog.
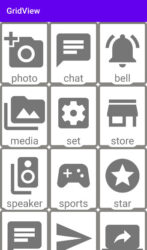
In this tutorial, we’ll make scrollable GridView images and text so display image and text GridView.
- There are many apps that use GridView to display each item’s grid row and column using an adapter.
- Each image or text we add through the adapter.
- In short, Items are automatically added to the GridView.
- A GridView that shows items in a two-dimensional scrolling grid.
- We’ll use 3 columns so that show in GridView.
- GridView is default scrollable so no needed to add scroll view.
What is GridView?
Gridview is the same as ListView. But gridView displays each item’s grid of views like image or text.
Gridview android topic?
- In the GridView tutorial, we will cover the topic in brief below.
- Gridview UI design.
- Each item fetches through Adapter.
- Drawable shape.
How to create GridView in android?
Now, let us start the GridView tutorial step by step.
Step 1:
firstly, Start android studio and create a new project in android studio.
Step 2:
Fill in all the required information, generally default filled automatically fill.
Also Read: AlertDialog box in android
Step 3:
Open activity_main file for example
Res -> layout -> activity_main.xml
Add below widget in activity_main.
<GridView
        android:layout_width="match_parent"
        android:layout_height="match_parent"
        android:numColumns="3"
        android:columnWidth="100dp"
        android:id="@+id/gridview"/>
The above GridView has used some attributes such as.
- Id: identifies the GridView.
- numColumns: displaying item column-wise. Here used 3 columns.
- ColumnWidth: this attribute defined fixed width for each column.
Let’s see a full example of GridView UI.
Activity_main.xml
<?xml version="1.0" encoding="utf-8"?>
<LinearLayout xmlns:android="http://schemas.android.com/apk/res/android"
    xmlns:app="http://schemas.android.com/apk/res-auto"
    xmlns:tools="http://schemas.android.com/tools"
    android:layout_width="match_parent"
    android:layout_height="match_parent"
    tools:context=".MainActivity">

    <GridView
        android:layout_width="match_parent"
        android:layout_height="match_parent"
        android:numColumns="3"
        android:columnWidth="100dp"
        android:id="@+id/gridview"/>

</LinearLayout>
Step 4:
- Now, needed some shape which is to use in a single data resource file.
- So, start a single resource file we’ll create a shape.
- We’ll create two shape files Because making a border text corner.
- Right-click on a drawable folder then create a new drawable resource file.
- for example Drawable -> file -> Drawable resource file
Border.xml
<?xml version="1.0" encoding="utf-8"?>
<shape xmlns:android="http://schemas.android.com/apk/res/android">
<stroke android:width="5dp"
    android:color="@color/border"/>
    <corners android:radius="5dp"/>
</shape>
Now, create a second drawable shape file.
Step 5:
Corner.xml
<?xml version="1.0" encoding="utf-8"?>
<shape xmlns:android="http://schemas.android.com/apk/res/android">
<corners android:bottomLeftRadius="15dp"
    android:bottomRightRadius="15dp"/>
    <solid android:color="@color/white"/>
    <padding android:left="10dp"
        android:right="10dp"/>
</shape>
Step 6:
- Now, we will use an adapter so now to create a single data file.
- Create a new XML layout resource file.
- for example Layout -> new -> Layout Resource file
- The xml layout resource file code is given below.
Singledata.xml
<?xml version="1.0" encoding="utf-8"?>
<LinearLayout xmlns:android="http://schemas.android.com/apk/res/android"
    android:layout_width="match_parent"
    android:layout_height="match_parent"
    android:gravity="center"
    android:background="@drawable/border"
    android:orientation="vertical">

    <ImageView
        android:layout_marginTop="20dp"
        android:id="@+id/imageview"
        android:layout_width="100sp"
        android:layout_height="100sp"
        android:src="@drawable/ic_launcher_background" />

    <TextView
        android:background="@drawable/corner"
        android:id="@+id/textview"
        android:layout_width="wrap_content"
        android:layout_height="wrap_content"
        android:text="@string/app_name"
        android:textSize="25dp" />
</LinearLayout>
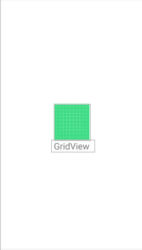
- In the above example, we used single ImageView and TextView as a result display data GridView.
- Now, create a custom adapter and extend the base adapter.
- Right-click on package creates a new java class, for example.
- Package -> new – > java class
Below code of the custom adapter.
Myadater.java
package com.pd.gridview;

import android.content.Context;
import android.view.LayoutInflater;
import android.view.View;
import android.view.ViewGroup;
import android.widget.BaseAdapter;
import android.widget.ImageView;
import android.widget.TextView;

public class MyAdapter extends BaseAdapter {
private Context context;
private final  int images[];
private final String name[];

private ImageView imageView;
private TextView textView;

private LayoutInflater layoutInflater;

    public MyAdapter(Context context, int[] images, String[] name) {
        this.context = context;
        this.images = images;
        this.name = name;
    }

    @Override
    public int getCount() {
        return name.length;
    }

    @Override
    public Object getItem(int position) {
        return null;
    }

    @Override
    public long getItemId(int position) {
        return 0;
    }

    @Override
    public View getView(int position, View convertView, ViewGroup parent) {
layoutInflater=(LayoutInflater)context.getSystemService(Context.LAYOUT_INFLATER_SERVICE);
convertView=layoutInflater.inflate(R.layout.singledata,null);
imageView=(ImageView)convertView.findViewById(R.id.imageview);
textView=(TextView)convertView.findViewById(R.id.textview);

imageView.setImageResource(images[position]);
textView.setText(name[position]);
return convertView;
    }
}
Step 7:
- Now, go to the main activity
- App -> java -> Package name -> MainActivity.java
- Before type the code, we will need some icons so we’ll import some icons.
- Right-click on drawable -> new vector asset.
Below code of MainActivity.java
MainActivity.java
package com.pd.gridview;

import androidx.appcompat.app.AppCompatActivity;

import android.content.Context;
import android.os.Bundle;
import android.view.animation.Animation;
import android.view.animation.AnimationUtils;
import android.widget.GridView;

public class MainActivity extends AppCompatActivity {
GridView gridView;
int Images[]={R.drawable.ic_baseline_add_a_photo_24,
        R.drawable.ic_baseline_chat_24,
        R.drawable.ic_baseline_notifications_active_24,
        R.drawable.ic_baseline_perm_media_24,
        R.drawable.ic_baseline_settings_applications_24,
        R.drawable.ic_baseline_store_mall_directory_24,
        R.drawable.ic_baseline_speaker_group_24,
        R.drawable.ic_baseline_sports_esports_24,
        R.drawable.ic_baseline_stars_24,
        R.drawable.ic_baseline_chat_24,
        R.drawable.ic_baseline_send_24,
                R.drawable.ic_baseline_screen_share_24,
                R.drawable.ic_baseline_school_24,
                R.drawable.ic_baseline_chat_24,
        R.drawable.ic_baseline_save_24};
String name[]={"photo","chat","bell","media","set","store","speaker","sports","star","chat","send","share","school","chat","save"};

    @Override
    protected void onCreate(Bundle savedInstanceState) {
        super.onCreate(savedInstanceState);
        setContentView(R.layout.activity_main);
        gridView=findViewById(R.id.gridview);

MyAdapter myAdapter=new MyAdapter(MainActivity.this,Images,name);
        gridView.setAdapter( myAdapter);
    }
}
Step 8:
Finally, Your GridView app is ready
Run the app.
Below is shown as the output of GridView.
