Android RecyclerView using CardView with example tutorial.
Recycler is a very useful widget in Android Studio. By adding CardView to Recyclerview we can create an additional feature. We will use cardview in recyclerview for better recycler view and also add additional features like selected random background color, text color and icon color. We will be recycling as we deliver custom UI design.
In the previous tutorial, we have explained ListView in detail. RecyclingView is similar to ListView, but it is a slightly higher version.
What’s new in recyclerview tutorial ?
This recycling view is not simple as we will be using some additional UI design features.
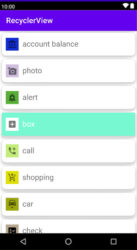
In this tutorial we will cover background random color, text random color and also set icon background random color when clicking on item.
We will use cardview so that recycler view looks extraordinary. Also added different icons and text in recyclerview so will display different icons with names in recyclerview.
Let’s understand RecyclerView point to point with example.
Step 1:
Start a new project in android studio.
Step 2:
Fill out all required filed and waiting a few seconds or minutes until grandle build.
Step 3:
Open build.gradle
Gradle Scripts ⇾build.gradle.
And add below dependency.
implementation 'com.google.android.material:material:1.3.0'
implementation'com.android.support:recyclerview-v7:30.0.0'
Then click on “Sync Now” in the right corner of Android Studio.
Step 4:
You know that in every Android tutorial, we do the first UI design before starting to code Java. So use UI design as usual in this tutorial.
So let’s start the design in the XML resource file.
First, will use the Recycling widget in activity_main.xml.
So first go to activity_main.xml and add RecylerView widget. The code is shown as below.
activity_main.xml
<?xml version="1.0" encoding="utf-8"?>
<androidx.recyclerview.widget.RecyclerView xmlns:android="http://schemas.android.com/apk/res/android"
    xmlns:app="http://schemas.android.com/apk/res-auto"
    xmlns:tools="http://schemas.android.com/tools"
    android:layout_width="match_parent"
    android:layout_height="match_parent"
    android:orientation="vertical"
    android:id="@+id/recyclerview"
    tools:context=".MainActivity">
</androidx.recyclerview.widget.RecyclerView>
Step 5:
Now, let’s start creating a single data file in the layout resource.
Right-click on layout and create a new layout resource file.
In a single data file, first add CardView widget, relative widget and under relative widget ImageView and TextView.
As like below, code of single data xml file in recylerview.
singledata.xml
<?xml version="1.0" encoding="utf-8"?>
<androidx.cardview.widget.CardView xmlns:android="http://schemas.android.com/apk/res/android"
    xmlns:app="http://schemas.android.com/apk/res-auto"
    android:layout_width="match_parent"
    android:layout_height="60sp"
    android:layout_margin="5dp"
    app:cardElevation="8dp"
    app:cardCornerRadius="10dp"
    app:cardPreventCornerOverlap="true"
    android:background="@drawable/border">

    <RelativeLayout
        android:id="@+id/relativelayout"
    android:layout_width="match_parent"
    android:layout_height="60dp">

    <ImageView
        android:layout_width="wrap_content"
        android:layout_height="wrap_content"
        android:id="@+id/imageview"
        android:layout_marginLeft="10dp"
        android:layout_centerVertical="true"
        android:layout_alignParentStart="true"
        android:layout_alignParentLeft="true"
        />
<TextView
    android:layout_width="wrap_content"
    android:layout_height="wrap_content"
    android:id="@+id/textview"
    android:gravity="center_vertical"
    android:layout_marginLeft="10dp"
    android:layout_toRightOf="@+id/imageview"
    android:layout_marginTop="15sp"
    android:text="@string/app_name"
    android:textSize="20dp"/>
</RelativeLayout>
    </androidx.cardview.widget.CardView>
Step 6:
Now, let’s start a Java code.
First, create a class named MyData.
As given below code.
MyData.java
package com.pd.recyclerview;

public class MyData {

    String name;
    int images;
//create contractor

    public MyData(String name, int images) {
        this.name = name;
        this.images = images;
    }
    //getter and setter

    public String getName() {
        return name;
    }

    public void setName(String name) {
        this.name = name;
    }

    public int getImages() {
        return images;
    }

    public void setImages(int images) {
        this.images = images;
    }
}
Step 7:
Now, we’ll create an Adapter class for managing and displaying a list of data in recyclerview.
App ⇾ java ⇾ right-click on the package name and create a new java class.
We’ll extends RecyclerView. The adapter also needs RecyclerView.ViewHolder is used to show a list of data in ViewHolder.
We’ll implement some methods right-click on it like onCreateViewHolder and onBindViewHolder.
Like below code of onCreateViewHolder method
    @Override
    public MyAdapter.ViewHolder onCreateViewHolder(@NonNull ViewGroup parent, int viewType) {
        LayoutInflater layoutInflater = LayoutInflater.from(parent.getContext());
        View item = layoutInflater.inflate(R.layout.singledata, parent, false);
        ViewHolder viewHolder = new ViewHolder(item);

        return viewHolder;
    }
For returning a new instance of ViewHolder. onBindViewHolder this method we use binds the data to the view holder. As below, the method is given.
@Override
    public void onBindViewHolder(@NonNull MyAdapter.ViewHolder holder, int position) {
        final MyData myData = mylist[position];
        holder.textView.setText(mylist[position].getName());
        holder.imageView.setImageResource(mylist[position].getImages());

        holder.relativeLayout.setOnClickListener(new View.OnClickListener() {
            @Override
            public void onClick(View v) {
                Toast.makeText(v.getContext(), "You are Click on" + myData.getName(), Toast.LENGTH_SHORT).show();            }
        });
Also, other methods implement like getItemCount for returning the size of the List.
For Random background color, use the below code.
    //random background color
        Random random=new Random();
        int color= Color.argb(255,random.nextInt(255),random.nextInt(255),random.nextInt(256));
        holder.imageView.setBackgroundColor(color);
        holder.imageView.setPadding(20,20,20,20);
When clicking on recycler CardView change the selected background, text color and show a toast message, so we’ll use the below code.
    holder.relativeLayout.setOnClickListener(new View.OnClickListener() {
            @Override
            public void onClick(View v) {
                Toast.makeText(v.getContext(), "You are Click on" + myData.getName(), Toast.LENGTH_SHORT).show();
            }
        });
    }
Now, see the full code of Adaptor class.
MyAdapter.java
package com.pd.recyclerview;

import android.graphics.Color;
import android.view.LayoutInflater;
import android.view.View;
import android.view.ViewGroup;
import android.widget.ImageView;
import android.widget.RelativeLayout;
import android.widget.TextView;
import android.widget.Toast;

import androidx.annotation.NonNull;
import androidx.recyclerview.widget.RecyclerView;

import java.util.Random;

public class MyAdapter extends RecyclerView.Adapter<MyAdapter.ViewHolder> {
    private MyData[] mylist;

    public MyAdapter(MyData[] mylist) {
        this.mylist = mylist;
    }

    @NonNull
    @Override
    public MyAdapter.ViewHolder onCreateViewHolder(@NonNull ViewGroup parent, int viewType) {
        LayoutInflater layoutInflater = LayoutInflater.from(parent.getContext());
        View item = layoutInflater.inflate(R.layout.singledata, parent, false);
        ViewHolder viewHolder = new ViewHolder(item);

        return viewHolder;
    }

    @Override
    public void onBindViewHolder(@NonNull MyAdapter.ViewHolder holder, int position) {
        final MyData myData = mylist[position];
        holder.textView.setText(mylist[position].getName());
        holder.imageView.setImageResource(mylist[position].getImages());

        //random background color
        Random random=new Random();
        int color= Color.argb(255,random.nextInt(255),random.nextInt(255),random.nextInt(256));
        holder.imageView.setBackgroundColor(color);
        holder.imageView.setPadding(20,20,20,20);

        holder.relativeLayout.setOnClickListener(new View.OnClickListener() {
            @Override
            public void onClick(View v) {
                Toast.makeText(v.getContext(), "You are Click on" + myData.getName(), Toast.LENGTH_SHORT).show();
//background and text color change
                    holder.itemView.setBackgroundColor(color);
                    holder.textView.setTextColor(Color.WHITE);
                    holder.imageView.setBackgroundColor(Color.WHITE);
            }
        });
    }

    @Override
    public int getItemCount() {
        return mylist.length;
    }

    public class ViewHolder extends RecyclerView.ViewHolder {
        public ImageView imageView;
        public TextView textView;
        public RelativeLayout relativeLayout;

        public ViewHolder(@NonNull View itemView) {
            super(itemView);
            this.imageView = (ImageView) itemView.findViewById(R.id.imageview);
            this.textView = (TextView) itemView.findViewById(R.id.textview);
            this.relativeLayout = (RelativeLayout) itemView.findViewById(R.id.relativelayout);
        }
    }
}
Step 8:
In lastly, go to MainActivity.java class file.
App ⇾ java ⇾ package name ⇾ MainActivity.java.
In MainActivity. Java class file, we’ll add a list of data and drawable icons.
Then, call the Myadater class on it.
Given the below code of MainActivity.java class.
MainActivity.java
package com.pd.recyclerview;

import androidx.appcompat.app.AppCompatActivity;
import androidx.recyclerview.widget.LinearLayoutManager;
import androidx.recyclerview.widget.RecyclerView;

import android.os.Bundle;

public class MainActivity extends AppCompatActivity {

    @Override
    protected void onCreate(Bundle savedInstanceState) {
        super.onCreate(savedInstanceState);
        setContentView(R.layout.activity_main);

        MyData[] myData = new MyData[]{
                new MyData("account balance", R.drawable.ic_baseline_account_balance_24),
                new MyData("photo", R.drawable.ic_baseline_add_a_photo_24),
                new MyData("alert", R.drawable.ic_baseline_add_alert_24),
                new MyData("box", R.drawable.ic_baseline_add_box_24),
                new MyData("call", R.drawable.ic_baseline_add_ic_call_24),
                new MyData("shopping", R.drawable.ic_baseline_add_shopping_cart_24),
                new MyData("car", R.drawable.ic_baseline_electric_car_24),
                new MyData("check", R.drawable.ic_baseline_fact_check_24),
                new MyData("translate", R.drawable.ic_baseline_g_translate_24),
        };
        RecyclerView recyclerView = (RecyclerView) findViewById(R.id.recyclerview);
        MyAdapter myAdapter = new MyAdapter(myData);
        recyclerView.setAdapter(myAdapter);
        recyclerView.setLayoutManager(new LinearLayoutManager(this));
    }
}
Now, run your app and see the output.
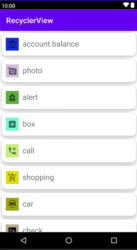
The output will look like the below image.


Simple RecyclerView Watch on YouTube


