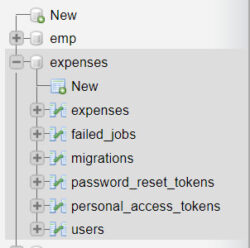
To better understand how to Migrate Database in Laravel, let’s create a simple example for expenses and name it accordingly.
If you’re looking to create a database in Laravel, the first step is to create a new project. To do this, simply install Laravel using Composer by running the command ,
How to Set Up project in Laravel
composer create-project --prefer-dist laravel/laravel your-project-name
replacing “your-project-name” with the desired name for your project. Once you’ve completed this step, you’ll have a fresh Laravel project to work with.
Now, to create a database, the first thing you’ll want to do is create a new model. This can be done using the command
How to create a new model in Laravel ?
php artisan make:model Expense -m
which will create a new model named Expense along with a migration file. This migration file will allow you to define the structure of your database.
Once you’ve created your model and migration file, you can define your Expense model by opening the app/Models/Expense.php file and adding the necessary code.
Add the following code:
<?php

namespace App\Models;

use Illuminate\Database\Eloquent\Factories\HasFactory;
use Illuminate\Database\Eloquent\Model;

class Expense extends Model
{
    use HasFactory;

    protected $fillable = ['description', 'amount'];
}
In the above code we defines the Expense model with two fillable attributes: description and amount.
Create columns in the MyModel model.
To Define the migration, Go to
database➡️migrations➡️xxxx_xx_xx_xxxxxx_create_expenses_table.php
Add the following code to define the expenses table:
<?php

use Illuminate\Database\Migrations\Migration;
use Illuminate\Database\Schema\Blueprint;
use Illuminate\Support\Facades\Schema;

class CreateExpensesTable extends Migration
{
    public function up()
    {
        Schema::create('expenses', function (Blueprint $table) {
            $table->id();
            $table->string('description');
            $table->decimal('amount', 8, 2);
            $table->timestamps();
        });
    }

    public function down()
    {
        Schema::dropIfExists('expenses');
    }
}
In this code, we are defining the expenses table with columns such as id, description, amount, and timestamps. By including these columns, we can efficiently store and retrieve data related to expenses in our Laravel application.
You can customize the table name according to your preferences. For the purpose of this tutorial on creating a database in Laravel, we’ll use expenses.
You can easily replace this field and add more fields as per your requirements, making it a customizable solution for your database needs.
Before running the migration command, it is crucial to ensure that your local server such as XAMPP or WAMPP is running.
Therefore, it is recommended to start Apache and MySQL before executing the migration command to avoid any issues. By following this simple step, you can ensure a smooth migration process for your Laravel project.
How to Add Database Name in the “env” File?
To create a database in Laravel, you need to first navigate to the .env file and locate the line that reads
DB_CONNECTION=mysql
DB_HOST=127.0.0.1
DB_PORT=3306
DB_DATABASE=expenses
DB_USERNAME=root
DB_PASSWORD=.
Once you have found this line, you can specify the name of your database. After doing so, the database will be created on your local server, ready for use within your Laravel project.
Same database name create in localhost.
If you have created a database with a certain name on your localhost, for example, “expenses” in the .env file, then you should use the same database name on your server.
To Migrate Database in Laravel
Run the Following command
How to Migrate database in Laravel ?
php artisan migrate

To check if the database has been successfully created, navigate to the URL http://localhost/phpmyadmin on your web browser. This will allow you to verify the status of the database. By doing so, you can confirm that the database has been properly set up and is ready to be used in your Laravel application.
This is the process to create a database in Laravel, which can help improve the functionality and performance of your website or application.
If you have any queries related to this tutorial, please feel free to contact.